by Maurice | Dec 1, 2019 | A3, Appraisal, Bizzarrini, Car Show, Collections, Fidia, Grifo, Isetta, Iso, Lele, Pebble Beach, PPI, Restoration, Ricky, Rivolta GT, Uncategorized |
I’m writing this update while Fidia #120 has been delivered and is awaiting the 2020 Pebble Beach Concours d’ Elegance presentation. This will be the first time there will be an official “Iso – Bizzarrini” class at this most prestigious event. Showing how much respect our brand has gained in the eyes of serious collectors. So I will now describe the last chapter in the Restoration Chronicles of this Iso Rivolta Fidia serial number 930120. And the car still showed some serious teeth even though it was the finishing phase! I would first like to show the presentation I gave to the public at Concorso Italiano last year – where I showed the car partially finished.
 It was indeed a spectacular presentation where both esthetically and technically inclined visitors got what they wanted. Mr. Piero Rivolta himself admired the car and remembered that these were his personal preference.
 After this show the finishing stage was entered. Now, all the installed parts had to be made functional and especially, the car had to start driving. First it went to finish the interior. The leather we chose was specially made according to the small independent company Iso used: Franzi. It is a beautiful blood red of a superb quality and it took quite some time at the upholsterer to finish it. Fitting seat belts were fabricated to match the hue and shine. I had to get it back partly finished because several electrical components had to be tested before we could button her up. The newly restored Becker Mexico Stereo cassette radio (with optional factory amp) was installed and for that the dash needed to be altered a bit.
 And as expected, of COURSE components like fuel gauge sender went bad when first driving it, great idea to not completely finish the interior yet!
The door seals as Iso used them were very special, they were hand sewn together from two separate pieces, to make them hide the rivets in the chrome roof molding. These were impossible to find so I tried to get the closest possible, which in turn made the doors become impossible to close right. It literally took months before the seals settled enough to make the doors close well enough.
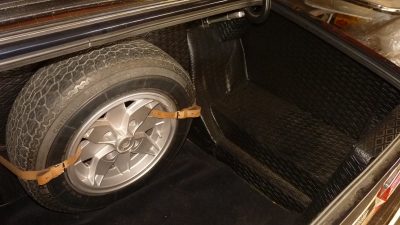
The original trunk material was deteriorated so I had it reproduced according to old samples. The tire cover is not installed to show the detail even in the trunk area.
 The custom radiator got painted and fitted and took away the fear of the car overheating again. The original radiators were just not adequate enough, this is now an aluminum cross-flow unit and keeps the car cool even with the air conditioning on. The A/C was finished and worked great – as far as Iso’s system Can work. For a big 4 door car like this it is adequate though, I drove it in 105’ San Fernando Valley weather and it kept up real well. Until it didn’t… It seemed there was a problem with the York compressor and after the (warranty) fix it never gave any trouble again. I wanted to keep the original (matching numbers) Quadrajet carb and after rebuild it just didn’t want to run perfect – at all. So I took it off numerous times to improve it bit by bit – I didn’t want to surrender and just buy a new one. The more I drove the car, the better it worked. I also wanted to keep the OEM fuel pump but after a lot of test miles it gave out on me so I had to go with a new one – the OEM GM one will stay with the car.
 New headlamp covers and scuff plates were fabricated, the car was coming together. The “griffon” wheel centers had been rechromed badly before and were too thin because of rust from within so I decided to fabricate new ones. I will describe the process at another time but basically I had a hardened “griffon” die made in which I hand formed brass plates and had them chromed after I put the correct dome in them.
And now they shine with like-new detail! The (stainless) front bumper didn’t have too much damage when I got the car but the rear one had been repaired and it took me many hours to get that to fit as it should. The problem with these stainless bumpers is that they are very thin and they warp very easy so I had to cut off the brackets, fit the bumpers “neutral” and weld on the brackets in that position again. Luckily the stainless welding rod matched the bumper metal perfectly so no weld is visible.
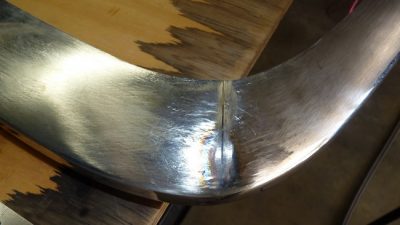 One thing I always URGE my clients to do now came in very handy! I tell them to make sure there is an emergency pull on both the hood and trunk lid, too often it happens that the main wire breaks. Well guess what??? The trunk lid cable broke and if it were not for the emergency pull I hid in the left taillight I would have had to cut the trunk floor open to gain access… So I’m glad I follow my own advise!! 😎
 After I was able to drive the car regularly certain items needed improvement, like the position of the breather tube in the air cleaner – something never made for the Iso setup.
I was able to take the Fidia to it’s very first cars and coffee on its own power. It was at the beautiful Malibu Beach C&C at Paradise Cove, put together by the late Andy Cohen. It was this Fidia’s first C&C and Andy’s last one as he passed away a few days later… I remember him walking up to me when I wasn’t even at the parking lot saying this was one of the first 4-door Italian cars on his event and whether he could jump in. Unfortunately he didn’t. Here is a picture of the car’s first presentation – still without rear bumper and passenger seat. After several successful test drives I turned the car over to the upholsterer and we buttoned the car up together. The hardest part on these is the center console – a nest of ALL wiring and very prone to shorts. I had taken precautions by extending all wiring so the lid could easily be taken off, still it took more than 2 days to consider the job done. After all the interior was in I was finally able to install the beautifully restored wood door panels! It’s extremely tricky work, to adapt every hole exactly to the tiny screw it attaches with.
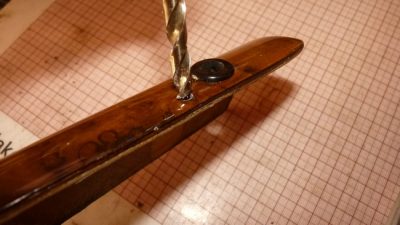 All had to be hand drilled, not a job to take lightly because one slip and it’s all over. But it came out wonderful and the following picture shows what I mean by that.
 I was then fortunate enough to drive the car to my friend Pete and officially deliver it to him. It was a moment we all awaited for a long time and the end of a very fun journey. Next up is the Pebble Beach Concourse d’ Elegance where it will be one of the very few S4/Fidias on the lawn. When you see this car there, remember that it has been restored as close to factory specs as possible: all nuts and bolts, washers and screws are restored OEM units and sit in the exact same position as it rolled off the factory floor with. If any Fidia can be used for authenticity purposes, this one is it! Leaves me to thank the owners Mark and Pete for their trust in my humble shop and skills and I’m sure I’ll see the car around a lot around Southern California!
by Maurice | Nov 25, 2018 | A3, Bizzarrini, Car Show, Collections, Fidia, Grifo, Iso, Lele, Restoration, Ricky, Rivolta GT |
It’s been a long road to have these manufactured the right way but in the end our efforts got rewarded big time! I have been keeping you updated on the process and how I had to reject the first production run of these. But the manufacturer (USA made) understood my complaints and reworked the molds and process and the result is no more than stunning. I decided on manufacturing the two most popular of the three versions and will thus be able to supply most of the Isos who need one.


They are perfectly factory correct in every detail and will complete any restoration. We made sure the gold and silver have the correct tone and shine while making sure the whole unit has an even better UV-stability than the originals. Because Isos own horn button production shows some dimensional tolerances I also had a limited amount of horn button beds made – just in case there is any doubt these buttons will fit your car. However, in 99% of all cases they will fit and they only need replaced when yours is broken or worn out.

I will try to get them up on my site as soon as I can so some of these can be used as a unique Christmas present. Thank you everybody involved in this project – another journey with a great ending!
by Maurice | Sep 17, 2018 | Car Show, Grifo, Iso, Monterey, Pebble Beach, Restoration, Ricky |
Finally time for an update!!
We have had some time to relax after the hectic Monterey Car Week. The Iso insiders already knew I was working on getting the unbelievable Grifo #405 ready to be shown. This car was found in Oregon after being stored for 38 years in a humid environment, never moved from it’s position other than finally moved from an open pole barn to a concrete building. Not on it’s own power, the motor and brakes were locked up and basically the car was unsafe when found. It had a total of 005950 Miles racked up before being stored. It was my intention to show it in the Preservation Class at Pebble Beach. After several discussions with the “judges” I decided to not change anything about the car until it was shown on the lawn… Unfortunately on April first (no joke) I received a letter from the “committee” explaining that without further given reasons this Grifo would not be accepted in their Preservation Class. So I had 4 months to get the car ready for Monterey Week!
First I had to pull the motor because it was just a lump of rust and it was seized – water had been running into it and I wasn’t able to turn it even with the tallest wrench.

To just get an idea of what humidity does to a car take a look in the trunk. (Which I called a bio-hazard) The aluminum vent tube form the gas tank was corroded off the tank – it had to be rewelded to be safe and functional.

At the same time I opened the transmission and found the owner hasn’t been too nice on the synchros. I put in original ZF parts and the motor received new bearings, seals and gaskets but stayed as standard as it was. No modifications, all clamps and hoses were either restored or exchanged for OEM ones. Built to 1973 Mustang specs, with it’s unique dual point distributor – it was soon ready to rumble!

Talking about rumble: this Grifo still had it’s factory original exhaust system! So I restored it and this is now the only Grifo I know of with a factory exhaust system.

While the drive train was out I could tackle the body and suspension parts and get the engine bay ready for serious detail work. All steering, cooling, electrical and brake parts were restored to stock configuration. Even the hood springs got their cloth liner back.

All components got powder coated and all usable hardware was cad plated – luckily my daughter June we on vacation to help me figure out the mess I made with the nuts and bolts, hahaha!! She learned when she was just 7 or 8 so she’s used to it.

I turned everything from a rusted pile into a factory new look, complete with all new bushings, bearings and shocks.

The paint itself was left untouched, my “dent-guy” Steve made sure the old “mechanics dents” were taken care of and the panels are straight like new. Cheers Steve Brown!

The drive train was put back, everything restored like factory specs and the first test run was done 8 days before Monterey Car week began!

The interior was taken out and the rodent nests removed, it needed a new headliner because that’s where they lived. The bumpers were straightened, all stainless polished and a few days before Monterey I was still mounting the bumpers.
The car was scheduled to be on the lawn in Monterey Saturday morning but Friday night the trucked called me to tell me his truck broke down – I had to figure out how to get the car to Monterey! After a long night of phone calls and not being able to hire anyone to pick it up I decided to take it out of the trailer and make it’s first test drive right up to the lawn! To make a (very!) long story short; it got there in good order and we had time to detail it for the show. It was shown with fully original interior (except new headliner), fully original paint, wheels, tires, exhaust system and sheet metal.

Needless to say – it was a great success! We had 8 Isos on the lawn – one of the biggest attendances the last few years. Grifo 405 won Second in class and a First prize with the Iso-Bizzarrini Club. The people I spoke to about the car all agreed that this Grifo is very unique and the Iso community is better off because it still exists.

Ricky got his prize later at the Iso-Bizzarrini dinner after a job well done supervising me in the shop. What a great experience to have been part of the resurrection of Grifo 405! Thank you for everybody who attended, gave their input and enjoyed it as much as I did!

by Maurice | May 26, 2018 | A3, Bizzarrini, Car Show, Fidia, Grifo, Iso, Lele, Monterey, Pebble Beach, Restoration, Rivolta GT, Uncategorized |
News from Iso Central…
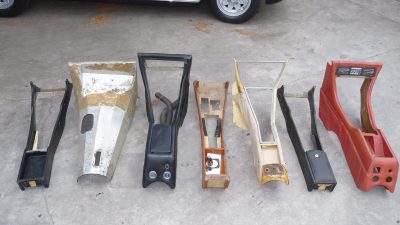
Now Monterey is just 10 weeks away I came to realize how many projects I’m working on at the same time. I don’t have/take the time to take pictures to post but here is an overview of the Iso/Bizzarrini interiors that are still out. And that doesn’t include the 2 Rivolta GT’s and one early Fidia I’m working on: one A3/C for paint; one for sheet metal; two Iso Grifo’s still have the suspension and motor and transmission out and one Fidia is now 7 months late for upholstery…
Nervous yet??? 😎
Maybe someone can determine what cars these consoles go to?

by Maurice | Mar 10, 2018 | Fidia, Grifo, Iso, Lele, Restoration, Ricky, Rivolta GT, Uncategorized |
As many of you already heard I have decided to reproduce the (rarer-than-hens-teeth) horn buttons for Iso Rivolta cars. To keep the production as efficient as possible we chose to use two of the most often used designs. This is the early “Horseshoe” design and the “Griffon” which is used on several models including Grifo. I decided to also have the underlying bed reproduced as they are often cracked or worn. For this I provided the very best examples I had collected through the years for each style and after several quality checks in December 2017 the complete batch was cast. Their fit was perfect and I was happy to tell them to go ahead with the coloring.


The coloring is a three step project, it involves gold metallic, gloss black and chrome – in three separate steps. This week I received the first sample that used the gold color we need in the correct hue and shine! This was a big step forward. We will now focus on the masking for the chroming process. I’m excited and hope to update you soon on any further progress!!

by Maurice | Jul 30, 2017 | Car Show, Fidia, Iso, Monterey, Uncategorized |
The time for assembling our Fidia has begun; most all components have been rebuilt and made optically factory correct. The body got a special undercoating and engine compartment treatment and the cabin and doors received a special sound deadener. I then first wanted to make the car a roller so all suspension components were installed, all new bushings, the (super heavy) Salisbury differential and intricate system of brakes and drive line. A fully rebuilt steering column was installed and the highly detailed original wood “Personal” steering wheel was wrapped well to keep it from being marred. All came out perfect! The gorgeous looking Ariston shocks were installed with the correct decals and once the newly restored wheels were mounted we had a car we can roll around again! The wheels are a whole deal of their own, they are made of Elektron, a highly reactive Magnesium alloy that can even corrode under a paint layer. The wheels on this car have been hand stripped, hand sanded, specially primed and painted with the factory correct hue of silver metallic. One wheel had a crack in one of the mounting holes and had to go through a special welding process and came out perfect – the disadvantage of working with 48-year-old Magnesium! New Pirelli Cinturato tires make the car have a wonderful stance again!
The next majorly important component is the fully restored original wire loom – complete with correct ends for the many factory options this car came with. I used the correct ties and routing through the cabin, I only upgraded the stereo wiring and left all else stock. In October 2016 the engine was completed and hooked up with the Muncie 4-speed. The valve covers and bell housing were treated with a special finish which GM used and will not fade in time. Installing the engine and transmission HAS to happen in one unit, the narrow chassis does not allow this separately. It’s a pretty intense job, knowing all paint is done and NO scratches are allowed! But it went perfect and I could focus on the (expansive) work of putting the rest of the car together.
The side glass systems were next and didn’t make it not easy on me… It seems the Iso factory took a very easy (and sloppy) route to install the door glass and make it actually seal with the door frames. Iso glued strips of plasticized cardboard under the window felt to keep rainwater out. To be honest, it looked cheap and unprofessional. I was able to modify their NOS window felt in a way that it looks totally factory correct AND the different thicknesses are not visible to a critical onlooker. If you ever see the car on a show, please check out the differences in window felt. I know, these are small details but in rare and unique cars like these one HAS to think in detail to get this right. Like this window felt there are literally dozens of parts that need such special attention and completing such work is very satisfying in the end. Not for everyone but then again these cars are not for everyone…
Early 2017 lots of items neared its finishing stage and many ready-to-go components were on my shelves – this is the time when everything comes together and the prep work BETTER be perfect! The leather was being produced after lots of research was done, we’re reproducing the original Franzi leather and my good friend Henk from HVL Leathers in Holland is the go to man for this. Around this time we started to plan to show the car in Monterey for the 50th anniversary of Iso Fidia, however, we understood all the stars had to be aligned for this to happen. Restoring an Iso is not just ordering the needed parts and put them together… Several glass seals turned out to not fit Fidia and I had to have them reproduced, they were all on my shelves now. All the chrome and stainless was back, some were returned because it was not to my standards. The instruments were back from being rebuilt and looked gorgeous. The dash and door panel wood was newly fabricated and was awaiting installation in a box in my bedroom…
Another item that has been planned for a while (years) was replacing the (broken) windshield with a new one. I looked all over the planet and the best one I could find was one of an early Fidia I sold to Italy – however it just was not good enough for this car. So I decided to have a batch fabricated and after many disappointments, I was promised we’d make the August 17th deadline…
A new dual exhaust system was mounted in a perfect manner, it is all new but fully to original specs and with factory hardware. We did make it flow a bit better and it sounds like it should now. A newly rebuilt Becker Mexico signal seeking radio was ordered and an original Autovax electric antenna was installed under the right fender.
Around this time a new crossflow radiator was planned. I wanted to have it a look as original as possible, so my master craftsman Patrick hammered out a simulated top tank with a specially fabricated “Firsat Torino” embossing. While this is going on the leather was flown in and the car could go in for upholstery. Because of a few delays, it became clear the interior could not be completed fully. It was then decided to STILL show the car in Monterey for the Fidia Anniversary no matter how far the restoration was finished – it will be shown as a partial restoration so there is no excessive pressure to get it done as happens so often. I decided to install the headliner and carpet and I will finish most of the dash (wood) so other critical parts can be finished before the August 19 show. My goal now is to drive it onto the lawn on its own power and have people look at the perfection of the restoration work. This just shows that even a perfectly planned restoration has many variables that can interfere with that plan; some things just can not be predicted…
At the time of this writing, we’re putting the last finishing touches on the interior work and radiator. These Fidias had a very intricate finish of the dash wood, where it integrated a strip of interior leather in the seam of the dash wood. This came out beautiful and is one of the finishing touches that will make this car stand out. The completed windshield was finally installed in the last week of July 2017. It comes with a factory correct St. Gobain etching to make it correct in every detail. So as of the last week of July, the car has all the glass installed, including the rear glass with (working) heating elements. It will go to my painter next to correct the last imperfections and the plan is it to return to my shop to finish the mechanical work. Keeping my fingers crossed!
I would also invite you to visit me and the car at the lawn at Concorso Italiano in Monterey. Especially for the interested technical people, I’d love to explain more details about the restoration. I hope to see you there!
[newsletter_button id=1 showcount="true"]


