Restoration Chronicles: Iso Fidia – Assembly of Components

The time for assembling our Fidia has begun; most all components have been rebuilt and made optically factory correct. The body got a special undercoating and engine compartment treatment and the cabin and doors received a special sound deadener. I then first wanted to make the car a roller so all suspension components were installed, all new bushings, the (super heavy) Salisbury differential and intricate system of brakes and drive line. A fully rebuilt steering column was installed and the highly detailed original wood “Personal” steering wheel was wrapped well to keep it from being marred. All came out perfect! The gorgeous looking Ariston shocks were installed with the correct decals and once the newly restored wheels were mounted we had a car we can roll around again! The wheels are a whole deal of their own, they are made of Elektron, a highly reactive Magnesium alloy that can even corrode under a paint layer. The wheels on this car have been hand stripped, hand sanded, specially primed and painted with the factory correct hue of silver metallic. One wheel had a crack in one of the mounting holes and had to go through a special welding process and came out perfect – the disadvantage of working with 48-year-old Magnesium! New Pirelli Cinturato tires make the car have a wonderful stance again!

The next majorly important component is the fully restored original wire loom – complete with correct ends for the many factory options this car came with. I used the correct ties and routing through the cabin, I only upgraded the stereo wiring and left all else stock. In October 2016 the engine was completed and hooked up with the Muncie 4-speed. The valve covers and bell housing were treated with a special finish which GM used and will not fade in time. Installing the engine and transmission HAS to happen in one unit, the narrow chassis does not allow this separately. It’s a pretty intense job, knowing all paint is done and NO scratches are allowed! But it went perfect and I could focus on the (expansive) work of putting the rest of the car together.

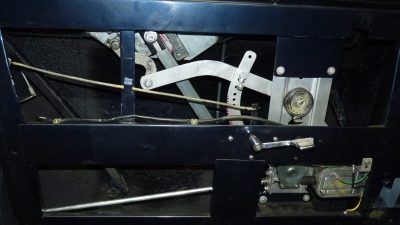
The side glass systems were next and didn’t make it not easy on me… It seems the Iso factory took a very easy (and sloppy) route to install the door glass and make it actually seal with the door frames. Iso glued strips of plasticized cardboard under the window felt to keep rainwater out. To be honest, it looked cheap and unprofessional. I was able to modify their NOS window felt in a way that it looks totally factory correct AND the different thicknesses are not visible to a critical onlooker. If you ever see the car on a show, please check out the differences in window felt. I know, these are small details but in rare and unique cars like these one HAS to think in detail to get this right. Like this window felt there are literally dozens of parts that need such special attention and completing such work is very satisfying in the end. Not for everyone but then again these cars are not for everyone…

Early 2017 lots of items neared its finishing stage and many ready-to-go components were on my shelves – this is the time when everything comes together and the prep work BETTER be perfect! The leather was being produced after lots of research was done, we’re reproducing the original Franzi leather and my good friend Henk from HVL Leathers in Holland is the go to man for this. Around this time we started to plan to show the car in Monterey for the 50th anniversary of Iso Fidia, however, we understood all the stars had to be aligned for this to happen. Restoring an Iso is not just ordering the needed parts and put them together… Several glass seals turned out to not fit Fidia and I had to have them reproduced, they were all on my shelves now. All the chrome and stainless was back, some were returned because it was not to my standards. The instruments were back from being rebuilt and looked gorgeous. The dash and door panel wood was newly fabricated and was awaiting installation in a box in my bedroom…
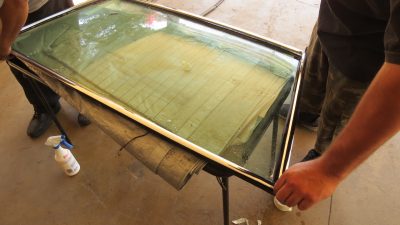
Another item that has been planned for a while (years) was replacing the (broken) windshield with a new one. I looked all over the planet and the best one I could find was one of an early Fidia I sold to Italy – however it just was not good enough for this car. So I decided to have a batch fabricated and after many disappointments, I was promised we’d make the August 17th deadline…

A new dual exhaust system was mounted in a perfect manner, it is all new but fully to original specs and with factory hardware. We did make it flow a bit better and it sounds like it should now. A newly rebuilt Becker Mexico signal seeking radio was ordered and an original Autovax electric antenna was installed under the right fender.

Around this time a new crossflow radiator was planned. I wanted to have it a look as original as possible, so my master craftsman Patrick hammered out a simulated top tank with a specially fabricated “Firsat Torino” embossing. While this is going on the leather was flown in and the car could go in for upholstery. Because of a few delays, it became clear the interior could not be completed fully. It was then decided to STILL show the car in Monterey for the Fidia Anniversary no matter how far the restoration was finished – it will be shown as a partial restoration so there is no excessive pressure to get it done as happens so often. I decided to install the headliner and carpet and I will finish most of the dash (wood) so other critical parts can be finished before the August 19 show. My goal now is to drive it onto the lawn on its own power and have people look at the perfection of the restoration work. This just shows that even a perfectly planned restoration has many variables that can interfere with that plan; some things just can not be predicted…

At the time of this writing, we’re putting the last finishing touches on the interior work and radiator. These Fidias had a very intricate finish of the dash wood, where it integrated a strip of interior leather in the seam of the dash wood. This came out beautiful and is one of the finishing touches that will make this car stand out. The completed windshield was finally installed in the last week of July 2017. It comes with a factory correct St. Gobain etching to make it correct in every detail. So as of the last week of July, the car has all the glass installed, including the rear glass with (working) heating elements. It will go to my painter next to correct the last imperfections and the plan is it to return to my shop to finish the mechanical work. Keeping my fingers crossed!

I would also invite you to visit me and the car at the lawn at Concorso Italiano in Monterey. Especially for the interested technical people, I’d love to explain more details about the restoration. I hope to see you there!

[newsletter_button id=1 showcount="true"]

Restoration Chronicles: Iso Fidia – Disassembly 4

It was at this point where we could finally determine the true extent of the coming restoration; taking out the doors, lids and mechanicals showed up how much hidden rust there was. The floors were weak, the doors were heavy coated in bondo, corners were rusted out and many fasteners broke when trying to loosen them. So it was easy to conclude we needed to disassemble it completely and strip it to bare metal. The whole wiring was documented (there are no wiring diagrams for these) and taken out, awaiting cleaning, inspection and restoration. Luckily the chassis was pretty good, except for repairing a few lower rust problems I could leave it as it was.

I found the (rare) Ariston shocks and it was obvious they needed to be rebuilt. I dropped these off at the Koni people but got them back with the message these could not be rebuilt… Then one person from the Pantera club told me he could rebuild them but after being on hold for one whole year I got them sent back – only with a bill attached for disassembling them… That story continues…

The windshield had a crack and trying to repair it I was told by a pro that someone already filled it with resin (incorrectly) and this was not able to repair it. I was offered a used one in Italy but when I visited them it had a major bull-eye so it was not usable. It was then when I started to contact companies to reproduce one for me and gave that order to a local company early 2015. I was to pick them up by October 2015… That story also continues…

The front suspension could be taken apart without too many problems, the rear suspension was totally different… Several (M12) bolts were rusted shut and only cutting them made them come out. Now is that not the biggest problem, were it not that one of those held the differential cradle right under the gas tank floor! I took many Dutch curse words before that bolt finally came out! Luckily, in the end, I always win and that was also the case when finally the whole DeDion system dropped on the floor. The greasy work was to begin as taking these hubs apart is probably THE dirtiest work on these Isos. The joy of a restorer!! But, in the end, all hardware was nicely sorted and ready for the plating process.

The body was ready to be stripped and to be careful I chose the soda blasting method. Because it can easily be washed away with water I did this in my backyard and the place looked like Aspen in wintertime after we were done. Ricky had a ball and of course inspected the work! We found several “repaired” damages and more-than-expected rust in doors and floors so a follow-up (harder) stripping method was needed. I marked the areas that needed sandblasting yellow and any serious rust was either removed or perforated sheet metal was totally taken out. After that; next stop was the specialized metal shop. It was hard to reserve a spot so I decided to start some body work in the healthy areas already. That too took some arm wringing but the body was now bare and needed to be primed ASAP – luckily I live in Southern California and not The Netherlands anymore! (And that was not purely meant politically 😎

While the car was gone, the work on the parts could start full blown. All parts were checked, documented, pictured, disassembled and sorted, prepared for either plating, powder coating or repair-rebuild. A few pictures illustrate that but I have literally 1000s of this process. During this process I ran into a rear Girling caliper with a serious crack and months of trying to find a replacement went unanswered. I contacted collectors and companies just to find out how rare these really are and this was when I had these welded by a genius in this field and it came out perfect. next was gold cadmium plating for these and assembly with new internals. Suspension parts were sorted, marked and separated for whatever job was next for them – it’s always interesting to press out the (rusted) shut bushings in these components… I think all but 2 had to be cut out instead of being pressed out… Any damages to them were filed, welded, re-threaded or straightened and awaited to be sandblasted and powder coated.

I can say that at this stage about 99% of the disassembly was done so my next update will show the actual “restoration” work on the car. Even though I love the disassembly (because it always teaches me about what NOT to accept from anyone working on cars!) my favorite work is to assemble all parts and put a car together with them. At this time – that was still far in the future…

[newsletter_button id=1 showcount="true"]

One Long Lost Iso Grifo – Part 5: going to a deserving home.

Once the dust had settled it can be stated that THE nicest original Iso Grifo on the planet has found the deserving home I talked about earlier. It was taken to the Gooding auction at Pebble Beach and the buzz was on that this car would make it’s presence there. Justin from Gooding had done a good job of getting the word out and even though this is not a “F-car” there were several very high end buyers present to see where this one ended up. It was presented well at auction and was in good company – the ex-Millner 7Litri was across the room in all it’s (restored) glory. Us insiders know the car and even though it presents beautiful it was not as “original” as Sam’s Series II small block Grifo 369. However, we had no hopes of beating it in a bidding war – our 369 was heading for a whole different clientele.

At the Concourse d’Elegance there was the rumor another fully original Grifo was to be shown there and it kinda scared us in that much that it could be a serious contender for Sam’s 369. However, as soon as I saw it on the Boulevard in Carmel it was obvious the car was no comparison to ours. It was yellow and it was obvious it was driven hard and put away wet – even though very charming the car showed tired and would need to be restored. Nevertheless, it was one of the few remaining original (driving) cars that can be used “as is” – it was well worth having it flown over from Italy. If it was not for Sam’s 369 I would have voted the yellow car for “best original”…

I met Sam at the car and we knew we had done the best we could – this was the moment to find out what the world thinks of an ORIGINAL car. The auction itself was perfectly executed except for the commentator calling the car “Aiso Griffo” – telling me just how unknown these cars still are! The bidding started at $200,000 and flew up to $400,000 within 20 seconds, where it stalled a bit and it ended up being sold at $465,000!! This means with buyer’s commission it ended up setting the record for an unrestored Grifo at $510,000! This was the reward for our hard work; Sam was happy and the car ended up with a good friend who is elated to have it in his collection now. It is among a gorgeous Bizzarrini Strada I found for him, a very unique Iso Grifo Can Am and many other high profile exotics. End good, all good!

Video:https://youtu.be/MAGcxtJzFrI

[newsletter_button id=1 showcount="true"]

Happy Father’s Day

Hoping all my fellow dads had a great Father’s Day! Here are some pictures from the Rodeo Drive Concours that was held today in Beverly Hills.

[newsletter_button id=1 showcount="true"]